Atari ST - Compute! - 1986
Compute's ST Artist
- Genre
- Graphics - Miscellaneous
- Year
- 1986
- Language
- BASIC
- Publisher
- Compute!
- Controls
- -
- Distributor
- —
- Resolution
- Low
- Developer
- [n/a]
- ST Type
- ST, STe / 0.5MB
- Licensed from
- —
- Programmer(s)
- Noel, Lee Jr. / Bateman, Selby
- Country

- MIDI
- —
- Software
- English
- Version
- —
- Box/Instructions
- English
- Number of Disks
- 1 / Single Sided / HD Installable
- License
- Magazine
- Dump
- Download
- Serial
- 70XBDSK
- Dump format
- ST
- Protection
- —
INSTRUCTIONS
************************************
*                                  *
*     PLEASE READ THIS FILE IN     *
*                                  *
*     MEDIUM OR HIGH RESOLUTION    *
*                                  *
************************************


COMPUTE!'s ST ARTIST DISK
-------------------------


Appendix F in the ST Artist book is a complete table of
contents for this disk. It also gives book figure references for the
various disk files. The disk-based document you're now reading
contains additional special notes on how best to use the
individual files in your own art projects.

Before you start working with the ST Artist disk, insure that it's
write-protected. To do this, make sure that the disk's write-
protect tab is pushed to the top of its slot, leaving a
small, square opening in the plastic disk housing.

Once that's done, make a backup of the disk. Don't write-protect
the copy, at least not yet. Instead, copy the SLIDENEO.PRG that
accompanies NEOchrome onto the backup. Now, simply by double-clicking
on this program, you'll be able to see a show of all the
picture files on the ST Artist disk. This provides a quick method
of visually reviewing the pictorial material. The SLIDENEO
program cycles continuously, so when you've seen enough press
the space bar to break out of the program and return to the
Desktop.

Three of the files have been saved with color cycling in action.
As a consequence, viewing them with the SLIDENEO program displays
some of the various animation features attainable through the use
of color cycling. Two of the three, ST_LOGO and LITEHOUS, are
displayed briefly. In the first, there's momentary highlighting
of the golden letters; in the second, the sea washes up against
the rocky point on which the lighthouse stands. The third
animated picture, KANGAROO, is displayed for a considerable time.
During this stage, your disk drive will stop spinning. Don't
worry, this is intentional. This particular file demonstrates how
color cycling can result in a realistic depiction of motion.
After the mighty marsupial has made a number of journeys past you,
the picture show will resume and your disk drive will return to
life.

Although some of the other files on the disk may seem easier to
understand, these three animation files can actually provide
an excellent starting point for graphics experimentation.
If they're loaded normally into the main NEOchrome program, the
range, speed, and direction of color cycling can be easily
changed. (You may find it less distracting to make a new version
of the Kangaroo picture from which the Shadow Cat and Chocolate
Soup designs have been removed.) The resulting effects are easily
spotted and will help you gain a deeper understanding of how color
cycling can be used in the animation process. One obvious change
you can make is to move the cycling range in the lighthouse
picture so that the light beams rather than the sea are affected
by it. The lighthouse section in Chapter 8 of the book gives full
details on the colors involved in the animation.

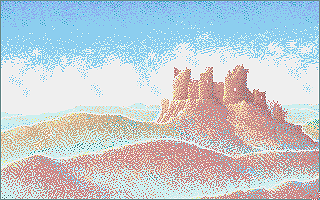
Another of the pictures, CASTLE, is not an animated picture as
such, but has been saved with a short color-cycling range
established on certain tones of blue. If you try cycling these
colors, you'll notice some striking effects. These are somewhat
akin to the solarization effects often seen in photographic
imagery. In addition, the palette in this picture is a good
example of muted, natural colors. Shifting the color range so
that it includes the green colors in the palette, as well as the
red ones used in the castle, will allow you to cycle the reds out
of the castle and replace them with green. It's thus possible to
rapidly change the character of this scene from warm to cool.
This is another example of the flexibility provided to the artist
by the computer canvas.

The final full-color picture, FISHRMAN, is merely a tinted version
of the figure appearing in the book. It does illustrate, however,
the effectiveness of various coloring and texturing methods, all
of which are relatively easy to achieve with computer art
programs.

All of the colored pictures on the ST Artist disk were created
directly from the files used to produce the figures in the book.
These files were later processed with a test version of Batteries
Included's DEGAS Elite. The Change feature, described in Chapter
7 of the book, was used to alter the colors of pixels without
disturbing their positions. This remarkable tool made it possible
to pass numerous washes of color over each picture without greatly
affecting the basic structure. Here, once again, computer
graphics resulted in a time-saving technique that would have been
difficult indeed to duplicate with conventional media.

At the time the book was written and this disk was prepared, all
STs were accompanied by copies of NEOchrome and SLIDENEO. If some
disk buyers are without these programs, the conversion programs on
this disk can be used to convert the NEOchrome picture files into
DEGAS format. Naturally, this also applies to those who prefer to
work in the DEGAS environment. Full details on using our
conversion programs, CONVERT1 and CONVERT2, are given in Appendix
B of the book. DEGAS Elite users can load the NEOchrome format
picture files directly into their graphics programs.

The other three picture files on the disk - EQUIPMNT, NEOTOOLS,
and STRCTURE - are also NEOchrome files; and for the most part,
they contain images that would be difficult to produce with that
program. Since these library files are packed with images, it may
not be immediately clear how to separate the elements for
individual use.

In brief, here's all that needs to be done. Simply load the
desired file; then use various erasing methods to separate the
target image from the rest of the file. Once that's done, use the
copy box to place the image in the NEOchrome buffer. From there,
the image can be pasted into position in any number of pictures or files.
The basic shape remains safe, of course, in the original NEOchrome
file.

The EQUIPMNT file contains numerous ready-made picture elements.
This may be a good place to start if you're not feeling confident.
The circles and ovals in the NEOTOOLS file should be particularly
welcome. This file also contains several complete alphabets that
may be lifted out for use in personal publishing projects.
STRCTURE, too, has a wealth of useful material, including custom
fill patterns created with DEGAS that were used in projects in the
book. These can be cut from this file and used for NEOchrome
fills with the method outlined in Chapter 3.

These files can be used in DEGAS and Elite in much the same way,
although DEGAS itself lacks the convenience of a buffer. DEGAS
users can, however, directly utilize the fonts and fill patterns
that comprise the remainder of the disk contents. Samples of the
various fills and typefaces are visible in the library files.
Naturally, the full range of type sizes will be available when
the fonts are loaded directly into DEGAS.

We hope that the material on the ST Artist disk will be both
encouraging and useful in your ST art projects. Good luck with
them, and with all your computing.

Bateman and Noel, 1986.