Atari ST - 1990
DC Mouse Stick
 1 / 6
1 / 6- Genre
- Patch / Driver
- Year
- 1990
- Language
- Machine Language
- Publisher
- [no publisher]
- Controls
- Joystick / Mouse
- Distributor
- -
- Players
- —
- Developer
- Double Click Software
- Resolution
- Low / Medium / High
- Licensed from
- -
- Programmer(s)
- Vederman, Michael
- Country

- Graphic Artist(s)
- —
- Software
- English
- Game design
- —
- Box/Instructions
- English
- Musician(s)
- —
- License
- PD / Freeware / Shareware
- Sound FX
- —
- Serial
- —
- Cover Artist(s)
- —
- ST Type
- ST, STe, TT / 0.5MB
- MIDI
- —
- Version
- 1.0
- Dump
- Download
- Number of Disks
- 1 / Double Sided / HD Installable
- Dump format
- MSA
- Protection
- —
INSTRUCTIONS
DC Mouse Stick v1.0

FREEWARE Software by Michael B. Vederman

Copyright (c) 1990 Double Click Software

This program is a FREEWARE product, meaning you can copy it and distribute
it for FREE, but please keep this document with the program.

============================================================================

DC Mouse Stick allows you to use a joystick to emulate a mouse on the ST,
STe or TT computer.  You can plug the joystick into port 0 (normal mouse
port) or port 1 (joystick port).


============
INSTALLATION
============

>To install DC MOUSE STICK, do this:
------------------------------------

1) Copy DCMSTICK.PRG to your AUTO folder.

2) Reset your computer.

When you bootup up, DC Mouse Stick will display a message and will install.

NOTE: If you run it from the desktop, you will be in CONFIGURATION mode.


=============
CONFIGURATION
=============
You can configure certain parameters which define DC MOUSE STICK's operation:

a) To use joystick port 0 or 1
b) The maximum speed DC MOUSE STICK will travel up/down or left/right
c) The minimum speed DC MOUSE STICK will travel up/down or left/right
d) The time to go from minimum to maximum speed
e) Whether DC MOUSE STICK uses a constant mouse speed


>To configure DC MOUSE STICK, follow these steps:
-------------------------------------------------

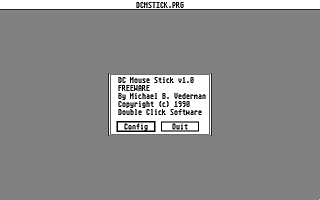
1) Execute DCMSTICK.PRG from the desktop.  You will be presented with an
   introduction alert box asking you to : CONFIG or QUIT.  Press
   or click on the CONFIG button.

2) Next you will see an alert asking you which joystick port to use 0 or 1
   Choose the port you wish to have the joystick plugged in to.

NOTE: If you choose joystick port 1, you can have the mouse operational at
   the same time, _but_ you will not have the use of the RIGHT mouse button.
   The RIGHT mouse button is the same as the joystick 1 trigger, so it was
   made to act like the LEFT mouse button to allow you to perform 'clicking'.

   If you need the RIGHT mouse button, pick up our other FREEWARE program
   DC SLICK SHIFT, which allows you to use a modifier key (or keys) as one
   of the mouse buttons.

   If you choose joystick port 0, you can not use the mouse (since the
   joystick is in the mouse port ).  You will still probably want to
   use DC SLICK SHIFT, since the joystick only has one button, which is
   still used as the LEFT mouse button.

3) After selecting the port to use, you will be asked to set the:
   MAXIMUM UP/DOWN SPEED
   The current numeric setting is displayed (default is 20).  This is the
   number of pixels the mouse will move per screen cycle when it is going
   the maximum speed.

   Click on the minus ( - ) or plus ( + ) sign to change the speed.
   Click on OK or press  when it is set the way you want.

NOTE: The maximum speed will gradually be acheived after a certain amount
   of time has elapsed.  This is described in step 7 below.

4) After you set the maximum up/down speed, you will be asked to set the
   MINIMUM UP/DOWN SPEED
   The current numeric setting is displayed (default is 4).  This is the
   number of pixels the mouse will move per screen cycle when it starts
   moving.

   Click on the minus ( - ) or plus ( + ) sign to change the speed.
   Click on OK or press  when it is set the way you want.

NOTE: The minimum speed is the starting speed, if you choose to have the
   mouse speed accelerate to the maximum speed.

   IF YOU WISH TO HAVE THE MOUSE TRAVEL AT A CONSTANT UP/DOWN SPEED, USE
   THE SAME SPEED FOR THE MAXIMUM AND MINIMUM UP/DOWN SETTING.

5) Once you set the up/down speeds, you will be asked to define the
   MAXIMUM LEFT/RIGHT SPEED
   The current numeric setting is displayed (default is 20).  This is the
   number of pixels the mouse will move per screen cycle when it is going
   the maximum speed.

   Click on the minus ( - ) or plus ( + ) sign to change the speed.
   Click on OK or press  when it is set the way you want.

NOTE: The maximum speed will gradually be acheived after a certain amount
   of time has elapsed.  This is described in step 7 below.

6) After you set the maximum left/right speed, you will be asked to set the
   MINIMUM LEFT/RIGHT SPEED
   The current numeric setting is displayed (default is 4).  This is the
   number of pixels the mouse will move per screen cycle when it starts
   moving.

   Click on the minus ( - ) or plus ( + ) sign to change the speed.
   Click on OK or press  when it is set the way you want.

NOTE: The minimum speed is the starting speed, if you choose to have the
   mouse speed accelerate to the maximum speed.

   IF YOU WISH TO HAVE THE MOUSE TRAVEL AT A CONSTANT LEFT/RIGHT SPEED, USE
   THE SAME SPEED FOR THE MAXIMUM AND MINIMUM LEFT/RIGHT SETTING.

7) Now, you will be presented with another alert asking you:
   REACH FULL SPEED IN:
   120  SCREEN CYCLE(S)

   The mouse speed is increased in 3 steps from the minimum starting speed
   until it reaches the maximum speed.  This determines how long after the
   mouse starts moving until it reaches the maximum speed.  The screen
   cycles can be 50, 60 or 70 cycles per second, depending on the resolution
   and the computer.

NOTE: If you have mouse speeds set the same, then this setting doesn't matter.

8) After setting the time, DC MOUSE STICK will attempt to save the information
   back to itself.  If it succeeds, you will be presented with an alert
   telling you such.

   THAT'S IT.


=============
HOW TO USE IT
=============
Using DC MOUSE STICK is pretty easy.  Plug it in the joystick in the port
you chose, reboot your computer and start moving the joystick!

Use the joystick trigger to act like the LEFT mouse button.

This will be especially usefull for people who have a broken mouse, and
still want to use the computer.

Enjoy!

===========
MORE INPUT!
===========
If you like this program, great!

Be sure to let us know what ideas or comments you have about our software.
We are always anxious to hear what anyone has to say!

You can reach us almost everywhere!

========
By Phone
========
Double Click Software  : (713)977-6520

======
Online
======
GEnie       :  DOUBLE-CLICK (CATegory 30)
CompuServe  :  75300,577    (GO ATARIVend, area 13)
Usenet      :  uace0@menudo.uh.edu
DC BBS      :  (713)944-0108